Self-Hosting Web Applications Using Podman
Container-based deployment is a neat way to self-host an application. However, I always try not to go overboard with complexity. That’s why I won’t immediately join the chorus of Kubernetes disciples when members of my DevOps community ask me how to deploy container workloads. Searching for viable alternatives, I recently explored the much simpler alternative of Podman and Quadlet during a few of my live streams. In this post, I will tell you about the results:
- why I use a URL-shortener
- why I host it myself
- how to run Kutt in a Podman pod
- how to expose it to the internet using Nginx Proxy Manager
- how to manage it all using
systemd - how to safely store secrets in Podman
Are you with me? Let’s go!
Why I use a URL shortener
In my blog posts, course materials, and in chats, I use links to other useful information all the time. But their URLs are not always easy to type or remember, neither for me nor for my audience. A URL-shortener is a useful service that allows me to construct URLs that are much easier to memorize and type. Usually, they consist of one or a few simple words, prepended with a short domain name. The service then redirects visitors of these short URLs to the actual content. It’s a quality-of-life improvement for everyone.
Why I run it myself
URL-shorteners are not new. They started to be widely used when Twitter popularized micro-posts as a new type of social media. Its constraint with the 280-character limit discouraged users from including long URLs. Google’s introduction of UTM Tracking via query parameters made this issue even worse for marketers. URL-shorteners like bit.ly offered a workaround.
So why do I not simply use one of the existing URL shorteners? After all, I usually try to resist the NIH Syndrome, and rather make running services I won’t monetize Someone Else’s Problem™.
Well, turns out that those other people increasingly tend to make it my problem again. The two most common ways they do so is The Sunset and Platform Decay (aka Enshittification). Last year, Google announced the shutdown of their popular URL shortener goog.le, which will cause a tremendous amount of “link rot”, which is a term describing links in existing web documents turning invalid and unusable. And just the other day, bit.ly informed its users that links created with its free plan will soon stop sending an immediate redirect and instead show an interstitial page with ads.
In this day and age, we can rely on corporate web products less and less, which is why we have to take matters into our own hands. “Self-hosting” is the way to go if we want to stay in control of how our web content is distributed.
Run your own URL shortener with Kutt
Kutt is a great open source URL-shortening service that you can host yourself. You can use it to define your own shortcuts, and you can also modify an existing shortcut’s destination URL. So not only does the longevity of your URLs with Kutt depend solely on how long you’re willing to run your own service, it’s also extended by your ability to update them when their target URLs need to change.
Running Kutt is straightforward by using its container image. I’m using Podman to run it on a cheap virtual private server (VPS) on Hetzner Cloud. I chose Podman because it requires the least amount of effort and resources of all the container deployment solutions I’ve used so far.
In addition to Kutt, we also need a proxy server that exposes the service on the web safely with TLS encryption. We’re going to use the popular Nginx Proxy Manager for this purpose. It comes with a nice web UI that’ll make it easy to add more services at a later time.
Setting up Podman
By now, most current Linux distributions provide Podman out of the box. You will probably be able to install it simply using your distribution’s package manager. I installed my VPS with Fedora because it provides very recent versions of the tool.
A Kutt in a pod
For the deployment of Kutt, I found a well-built Compose file by YouTuber DB Tech. Compose files are a neat way to define a set of containers that together form an application. In this case, we have containers for the Kutt web application and for the Redis database it uses for caching. Here is the full Compose file. It’s in YAML format and defines two “services”, server (the Kutt web application), and redis.
services:
  server:
    image: kutt/kutt:latest
    volumes:
      - db_data_sqlite:/var/lib/kutt
      - custom:/kutt/custom
    environment:
      DB_FILENAME: "/var/lib/kutt/data.sqlite"
      REDIS_ENABLED: 'true'
      REDIS_HOST: redis
      REDIS_PORT: 6379
      JWT_SECRET: 0F5B2J0CcoaFIDehV14ngwd6Lp2YbyJM7YeFVkILB1 #random string of characters
      DEFAULT_DOMAIN: yourwebsite.com #no http or https
    ports:
      - 3000:3000
    depends_on:
      redis:
        condition: service_started
  redis:
    image: redis:alpine
    restart: always
    expose:
      - 6379
volumes:
  db_data_sqlite:
  custom:
I copied this definition to a file named compose.yml in a project directory I called kutt.
Inside the original file, I had to make a slight alteration to line 9 with the REDIS_ENABLED setting because of an issue that requires boolean values to be quoted when using Podman.
Podman’s compose sub-command supports Compose files by invoking either docker-compose, if it’s installed, or podman-compose. We’ll use the latter because it supports “pods”. Podman can group the service containers of an application in a so-called pod, just like its bigger cousin Kubernetes. Containers inside a pod can talk to each other via localhost, which simplifies many things. (And complicates others, as we’ll see later.)
First, let’s make sure we’ll be using podman-compose:
export PODMAN_COMPOSE_PROVIDER=/usr/bin/podman-composeNow we can start the pod:
podman compose --in-pod true up -dBecause I named the project directory kutt, Podman automatically created a pod called pod_kutt:
$ podman pod ls
POD ID        NAME        STATUS      CREATED     INFRA ID    # OF CONTAINERS
94387ff1aabd  pod_kutt    Running     2 minutes ago              2
Inside this pod, Podman launched the two service containers, kutt_redis_1 and kutt_server_1:
$ podman compose ps
CONTAINER ID  IMAGE                           COMMAND               CREATED        STATUS        PORTS                   NAMES
2bdf802c7739  docker.io/library/redis:alpine  redis-server          2 minutes ago  Up 2 minutes  6379/tcp                kutt_redis_1
8863e07584ae  docker.io/kutt/kutt:latest      /bin/sh -c npm ru...  2 minutes ago  Up 2 minutes  0.0.0.0:3000->3000/tcp  kutt_server_1
At this point, I was able to access Kutt via http://localhost:3000 from both my browser and the command line:
$ curl http://localhost:3000
Found. Redirecting to /create-admin
Success!
Adding Nginx Proxy Manager
For deploying Nginx Proxy Manager, I followed the same approach. I took the Compose file from the project website, copied it to its own subdirectory, and spun it up within a new pod.
However, I first had to take care of two requirements: The Compose file expects two subdirectories as storage volumes, and it needs to be able to bind the web application to the host’s ports 80 and 443, which requires privileges a normal user doesn’t have.
The subdirectories are easy to create:
mkdir data letsencryptTo allow the port allocation, we need root privileges:
sudo sh -c "echo 0 > /proc/sys/net/ipv4/ip_unprivileged_port_start"Now we can deploy Nginx Proxy Manager:
podman compose --in-pod true up -dLet’s test the web access:
$ curl http://localhost
...
<h1>Congratulations!</h1>
...
Another success! But we’re not going to set up our URL-shortener just yet. Let’s first hand over management to systemd.
Integrating containers into systemd with Quadlet
While the deployment with podman compose worked, we don’t want to have to manually issue commands every time we restart our host machine. From a system administration standpoint, an application that’s deployed in containers ideally should be handled just like any other service. It should be managed by systemd, which will allow you to do common tasks like systemctl start kutt to start the service, and systemctl enable kutt to get it started automatically at boot time. And fortunately, Podman has this integration with systemd in the form of Quadlet.
systemd uses so-called unit files to define the system services it has to manage. With Quadlet, we get a few new types of unit files that interface directly with Podman to run container-based infrastructure. Quadlet files live in /etc/containers/systemd.
Each Quadlet file in turn references a service unit file that can, among other things, run a single container or a whole pod. In summary, we will need a pod unit definition for each service, and a Quadlet file to have it managed by systemd. Since we want to deploy both Kutt and Nginx Proxy Manager, we will need four files in total.
However, Quadlet doesn’t use Compose files as service units. Instead, it reads pod manifests, a different YAML format used by the resource orchestration software Kubernetes. Fortunately, Podman makes it easy to generate such a file right from an already running pod. We just need its name or ID.
$ podman pod ls
POD ID        NAME         STATUS      CREATED         INFRA ID    # OF CONTAINERS
9414b40c01c7  pod_nginxpm  Running     11 minutes ago              1
94387ff1aabd  pod_kutt     Running     18 minutes ago              2
Let’s generate the pod definition file for Kutt:
podman kube generate pod_kutt | sudo tee /etc/containers/systemd/kutt.ymlAnd for Nginx Proxy Manager:
podman kube generate pod_nginxpm | sudo tee /etc/containers/systemd/nginxpm.ymlMaking everything pretty
These pod definition files will work as generated by Podman, but I found the automatic naming less than ideal. First, I removed the initial comments and annotations, and shortened the pod and container names. I also assigned uniform volume names, and made sure their associated physical volume claims (PVC), which is how Kubernetes provides storage space for volumes, followed Kubernetes naming rules.
Here’s my kutt.yml:
---
apiVersion: v1
kind: Pod
metadata:
  creationTimestamp: "2025-02-20T15:53:07Z"
  labels:
    app: kutt
  name: kutt
spec:
  containers:
  - args:
    - redis-server
    image: docker.io/library/redis:alpine
    name: redis1
    volumeMounts:
    - mountPath: /data
      name: kutt-redis-pvc
  - args:
    - /bin/sh
    - -c
    - npm run migrate && npm start
    env:
    - name: REDIS_HOST
      value: redis
    - name: JWT_SECRET
      value: 0F5B2J0CcoaFIDehV14ngwd6Lp2YbyJM7YeFVkILB1
    - name: DEFAULT_DOMAIN
      value: mspc.sh
    - name: DB_FILENAME
      value: /var/lib/kutt/data.sqlite
    - name: REDIS_ENABLED
      value: "true"
    - name: REDIS_PORT
      value: "6379"
    image: docker.io/kutt/kutt:latest
    name: server
    ports:
    - containerPort: 3000
      hostPort: 8000
      hostIP: 127.0.0.1
    volumeMounts:
    - mountPath: /var/lib/kutt
      name: kutt-sqlite-pvc
    - mountPath: /kutt/custom
      name: kutt-custom-pvc
  volumes:
  - name: kutt-redis-pvc
    persistentVolumeClaim:
      claimName: kutt-redis
  - name: kutt-sqlite-pvc
    persistentVolumeClaim:
      claimName: kutt-sqlite
  - name: kutt-custom-pvc
    persistentVolumeClaim:
      claimName: kutt-custom
I set the value for DEFAULT_DOMAIN (line 28) to “mspc.sh”; a URL shortener should have a short domain name, after all. I also changed the host port mapping to port 8000 because I think it’s a better fit for HTTP-based services.
Speaking of port mapping, you can see that I also added hostIP: 127.0.0.1 in line 40. This connects the web application to the host’s localhost interface, but not to its external NIC. This way, it will not be reachable from the internet; we want to let Nginx Proxy Manager take care of that.
For the Nginx Proxy Manager pod, I did the same clean-up, and also replaced the directory-based volumes with physical volume claims:
---
apiVersion: v1
kind: Pod
metadata:
  creationTimestamp: "2025-02-20T15:59:42Z"
  labels:
    app: nginxpm
  name: nginxpm
spec:
  containers:
  - image: docker.io/jc21/nginx-proxy-manager:latest
    name: nginxpm
    ports:
    - containerPort: 80
      hostPort: 80
    - containerPort: 81
      hostPort: 81
    - containerPort: 443
      hostPort: 443
    volumeMounts:
    - mountPath: /data
      name: nginxpm-data-pvc
    - mountPath: /etc/letsencrypt
      name: nginxpm-letsencrypt-pvc
  volumes:
  - name: nginxpm-data-pvc
    persistentVolumeClaim:
      claimName: nginxpm-data
  - name: nginxpm-letsencrypt-pvc
    persistentVolumeClaim:
      claimName: nginxpm-letsencrypt
At this point, we can get rid of the Compose deployments we used to get here. Simply execute podman compose down for both Kutt and Nginx Proxy Manager, and remove the volume directories as well.
To launch the two services using our newly created pod definition files, we use the command podman kube play:
$ sudo podman kube play /etc/containers/systemd/kutt.yml
...
Pod:
465c57697148a9a737bf966b272a01b785d2674da8de990d0095093d34546128
Containers:
c84fdb5d07d7f16de2a79c606910bbe825fd7f09dcd76a542e02e824fc00f4e9
430eb4c1adb85096727f43dd159187e748d3babf59bab830ebd94e2d6ec2c36b
$ sudo podman kube play /etc/containers/systemd/nginxpm.yml
...
Pod:
b2d82d01d13fa4dae26bd177d2a3b88f6084907238ecb98c54150466c4c9f207
Container:
8e21f38468807eec2d0024c8b8f49724c8a8f97f0a23ee311f85ef0ee192c84d
As you can tell from the output, Podman created a pod and two containers for Kutt, and another pod and a single container for Nginx Proxy Manager; just as expected.
Turning a pod into a systemd unit
The final step is to hand over management of these pods to systemd. All we need for this are two Quadlet files. Since they reference pod definitions, their names both end in .kube. I had to create both files as root because the /etc directory is superuser territory.
For Kutt, there’s /etc/containers/systemd/kutt.kube:
[Unit]
Description=The kutt URL shortener
Wants=network-online.target
After=network-online.target

[Kube]
Yaml=kutt.yml

[Service]
TimeoutStartSec=900

[Install]
WantedBy=multi-user.target
Similarly, we have /etc/containers/systemd/nginxpm.kube:
[Unit]
Description=Nginx Proxy Manager
Wants=network-online.target
After=network-online.target

[Kube]
Yaml=nginxpm.yml
Network=host

[Service]
TimeoutStartSec=900

[Install]
WantedBy=multi-user.target
This second file has a tiny but important difference to the first. It prevents the pod from being isolated in its own container network; instead, it is bound to the host machine’s network interfaces. This is necessary because, as I explained above, the port 8000 that is connected with Kutt is bound exclusively to the host’s localhost interface. Without the Network=host setting in line 8, the Nginx Proxy Manager pod would get its own localhost interface, and this one wouldn’t know anything about Kutt.
Here’s a diagram that visualizes how the kutt pod has its own pod-internal localhost interface that the kutt and redis containers use to communicate. Only port 8000 gets forwarded from the Podman host into this pod. The nginxpm pod, on the other hand, is connected directly to the host’s network interfaces.
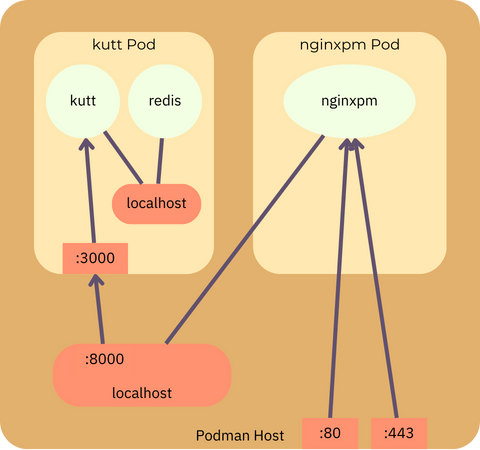
This allows us to set up a proxy host in Nginx Proxy Manager that forwards incoming requests to the Kutt container in the other pod.
Putting it all together
Now that we have both Quadlet files and pod manifests in place, we can let systemd take over:
$ sudo systemctl daemon-reload
$ sudo systemctl restart kutt
$ sudo systemctl restart nginxpm
As the final installation step after doing a quick initial setup of Nginx Proxy Manager by visiting my host machine in the browser, I set up a proxy host for the Kutt container bound to localhost:8000 with my desired domain name. Since I also enabled SSL support, everyone can now safely access my URL-shortener.

Handling secrets properly
As a bonus, we can make a small security improvement. One thing I didn’t like about the Kutt manifest is that it contained JWT_SECRET in plain text (just like the original Compose file did). I don’t regard this as good operations practice, given that Podman can store secrets in a safer way.
To do so, I created a Kubernetes secret definition file named secret.yml containing a long, randomly generated jwtSecret in line 3:
apiVersion: v1
data:
  jwtSecret: ZWlUbzl0aG9vZmFoR2gyUXVh5nb0g2YWhkb2hhZXoK
kind: Secret
metadata:
  creationTimestamp: null
  name: kutt-jwt-secret
After I had given the file’s contents into Podman’s safety, it wasn’t needed any more.
$ podman kube play secret.yml
Secrets:
3bfa1f97029464c220cd699ea
$ rm secret.yml
In kutt.yml, I then replaced the hard-coded value of JWT_SECRET with a reference to the key jwtSecret of the kutt-jwt-secret. The resulting env section now looks like this:
    env:
    - name: REDIS_HOST
      value: redis
    - name: JWT_SECRET
      valueFrom:
        secretKeyRef:
          name: kutt-jwt-secret
          key: jwtSecret
    - name: DEFAULT_DOMAIN
      value: mspc.sh
    - name: DB_FILENAME
      value: /var/lib/kutt/data.sqlite
    - name: REDIS_ENABLED
      value: "true"
    - name: REDIS_PORT
      value: "6379"
That’s much better than exposing the value in an unencrypted YAML file.
Conclusion
In this article, I explained all the steps that I went through to run my own URL-shortener using Podman. I laid out how to deploy the necessary applications using Compose files, how to derive pod manifests from the running containers, and finally, how to integrate them with systemd.
If you’d like to use Podman for self-hosting your own container-based applications, I hope this will be useful!
Do you have any questions or would like to dive deeper into this topic? Join The Server Room, my membership community for DevOps practitioners! Together with the many other friendly members, I’ll be happy to help you succeed.