Linux Shell for Beginners: The ls command
Hello DevOps friends! In this tutorial, we’re going to take a look at the ls command.
There is no Unix or Linux user who doesn’t use it on a daily basis, so I’ll teach you what you need to know.
The ls command is how you see what’s on your Linux disks. Type ls in your terminal, and it shows you all the files and folders right there. It’s usually one of the first commands you learn. Pretty simple, but super useful for finding your way around. This does not sound spectacular, right, not something to make a tutorial about?
Well, I’ve been using Linux since 1993. Would you believe that in preparation of this tutorial, I still learned something new about ls? So, even if you are a veteran Linux user, you might take away one or two interesting titbits from this.
And at the end, I’ll introduce you to a command that takes a fresh and even more powerful approach to what ls has been doing for decades.
So let’s dive right in!
Intro
Because it’s so essential, the ls command is included in the Core Utilities package that gets installed right when you set up your Linux distribution of choice.
This is how ls works by default: When you execute it on its own, it will list the files and folders in your current working directory.
Hidden files, as the name implies, will not be shown. On Linux, all files whose names start with a dot are treated as hidden files.
As you can see, the output of the command is sorted alphabetically, and it’s not immediately obvious which names are files and which are directories. We can improve this by using command options.
Options are additional arguments that you add after the command name. They change its behaviour, and they all start with a dash.
Long listing format
The option -l requests the “long listing format”. This format lists each file and directory on its own line with a whole lot of detail information. I’ll cover those details later.
Let’s see what the long listing format looks like.
That’s quite a bit more information than before! But apart from the file name and the modification date, it’s not quite obvious what all of this means. I’ll point it out for you.
Every line in the long format starts with a series of letters and dashes. It represents the file type and its access permissions. We’ll get to them in a minute. The solitary number that follows is the number of links related to the file. You won’t need this information often. The next two items designate the owners of the file. Every file can be assigned to one user and to one user group, and they are both listed here. Finally, there’s the file size and the last modification time before the file name is printed in the last column.
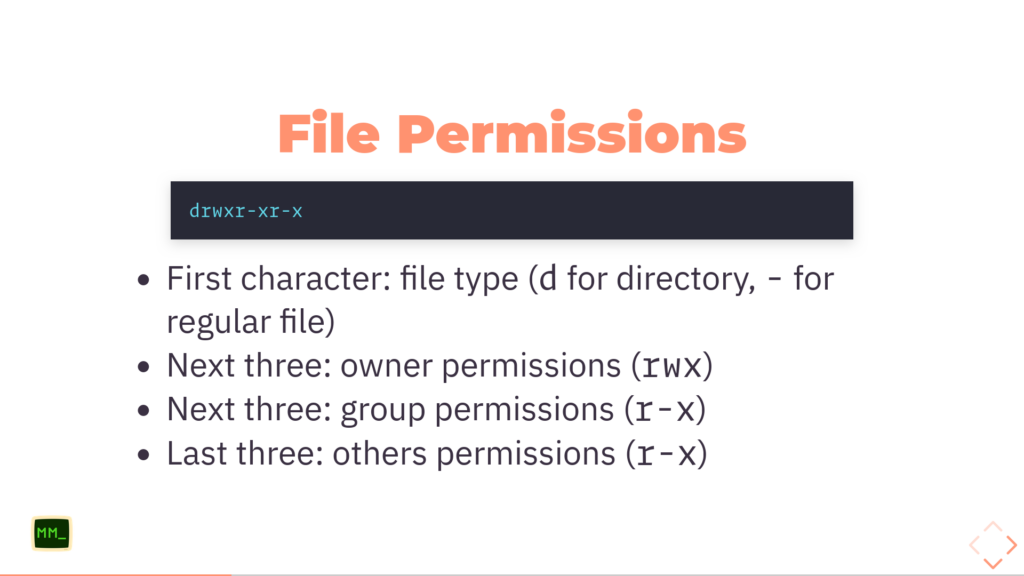
Let’s tease apart what’s hidden in the permissions pattern at the start of the line!
File permissions
The file permissions field is a combination of characters, and it consists of several groups, each of which has its own meaning. The first single character signifies the file type. A d stands for “directory”, while regular data files are represented with a dash -. There are other types as well, but they’re not relevant at this stage.
Following the file type character, there are three groups or sections of three characters each. They display the file permissions. The first section shows the permissions of the owner user, the second one the permissions of the owner group, and the third section the permissions of everyone else. This last section is often referred to as “others”.
We can see that each of these sections is composed of the letters ‘r’, ‘w’, ‘x’, and the dash ‘-‘. What do they mean?
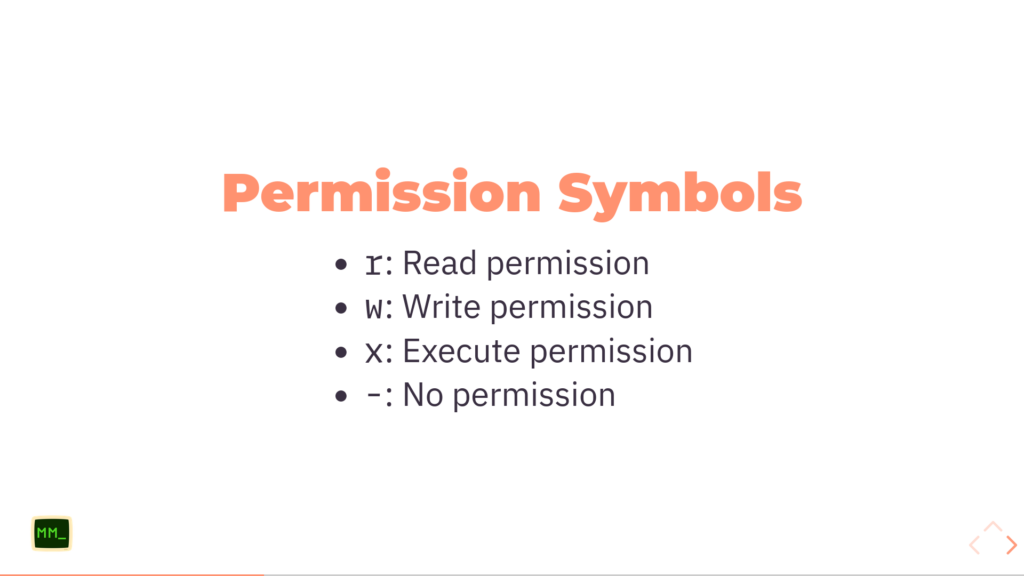
The ‘r’ stands for ‘read’ permission, which allows users to read the contents of the file or directory.
Similarly, the ‘w’ allows users to make changes. In case of a directory, making changes to the contents of it means creating and deleting files inside it.
The ‘x’ permission on a file makes it executable. With this permission, you can execute it from the Linux shell like any other shell command. In the case of a directory, the ‘x’ permission has a slightly different meaning. It allows users to enter the directory and thus make it their working directory.
If one of these permissions is not given for a specific section, a dash ‘-‘ takes its place.
These three permissions can be combined freely, but only a few of these combinations are commonly used. For files, you usually see r-- if a file is read-only, or rw- if write permission is given. For executable files, the x pops up in the third position. It’s similar for directories. Usually, the x permission goes hand in hand with read rights, so the two common combinations are r-x and rwx.
(Internally, these combinations are represented as octal numbers, but that’s something I’ll cover in detail in my Linux courses, not here.)
Hidden files
In the early days of Unix, the operating system developers noticed that more and more system and configuration files were accumulating in their home directories. Some of these files even contained sensitive information, for example, login credentials to some FTP server. To minimize exposure and clutter of the directory listing, the fathers of Unix devised a simple solution: files whose names started with a dot would be treated as hidden files and not displayed by ls if not explicitly requested.
This explicit request has the form of the -a option.
On closer inspection, you will notice that among the files this option reveals are always two special directories whose names only consist of dots. The “single dot” directory always represents the directory it’s located in. It allows the user to explicitly reference the current working directory. Similarly, the “double dot” directory stands for the parent of the current working directory. It makes it easy to reference or even switch to the directory one level higher in the directory tree.
Human-readable file sizes
Among other things, the long listing format also shows the file size. However, it shows it in bytes, and for large files, that’s impractical. “Wait, is that number in the million or in the ten million bytes range?” With the -h option, you get file sizes in human-readable form, with useful units like MB or GB.
This option only works in conjunction with the -l option because otherwise, there’s no file size to display.
As I mentioned earlier, you can pass multiple options to ls as separate arguments, or you can combine them into a single multi-option. In both cases, the order in which you pass in the options will not matter. ls -lh works identically to ls -hl, for example.
Sorting
The default sort order by name is useful when you’re looking for a specific file. However, other administration tasks will require a different order. ls has a few options in store.
With -t as in “time”, ls will sort the file list by modification time, starting with the newest file and ending with the file that hasn’t been touched in the longest time.
When you’re looking for candidates to delete to free up storage space, the -S with a capital S comes in handy. It’ll list files by size in descending order.
Speaking of order, you can always reverse the sort order you picked by adding the -r option. For example, ls -lr will give you a listing in long format in inverse alphabetical order.
Recursive listing
Sometimes, you need to see the contents not only of your current working directory but also its subdirectories. Maybe you’re looking for a specific file that’s in there somewhere. Maybe you just want to see how much stuff there is.
The -R option with a capital R will help you with that. The R stands for “recursive” because ls will go down into the first subdirectory and list its contents, then further down until it reaches the bottom, and then will do the same with any other subdirectory until it has traversed them all. Depending on the size of the filesystem hierarchy you’re in, this can take some time and yield quite a lot of output.
Output in colour
At the beginning of this tutorial, I highlighted the fact that with the default output of ls, it’s hard to tell which names are files and which are directories. Colour coding makes it easier. To enable it, use the special option --color=auto. (Note the American spelling with just an “o”.)
You can even change the default colour scheme, but I’ll leave that as a research exercise for you.
Listing specific files and directories
The ls command accepts not only options as its arguments but also file and directory names. When you pass in the name of a directory, ls will list its contents. In the case of a file name, you’ll see its details. Of course, if you don’t also pass in the -l option, the only detail you’ll see is the file’s name; that’s not very useful.
Wildcards
Not always can we be totally specific in naming a file or directory. Maybe we only remember the beginning of the name. Or maybe we just want the details of files of a specific type. This is where wildcards come in, or as they’re commonly named, “globbing characters”. They’re characters with a special meaning that act as placeholders for a larger set of possibilities.
The most simple globbing characters are the asterisk and the question mark. The latter stands for any single character, the former even encompasses any number of arbitrary characters. Note that this number may be zero.
For example, ls a* will list all files whose name is “a” or starts with “a”.
ls a? will show you any file whose name has two characters, the first of which is an “a”.
You can, of course, combine both wildcard characters. The output of the command ls *.?? will be a list of any files that have an extension consisting of two characters, for example abstract.md.
If we don’t just want to allow any character but a specific set, we can pass it to ls in square brackets. ls a[12] will only match the file names a1 and a2.
Character sets can also be specified as ranges. For example, the set 0-5 in square brackets will match any digit between 0 and 5. However, as you can see, there isn’t an a4 or a5.
And by the way, this “globbing” is actually not built into the ls command. It’s a feature of the shell from which you execute ls. But that’s a topic for my Linux and shell scripting courses.
As you already know, the command ls -l followed by a file name will display detail information on the file. However, with a directory name, it will list the details of all the files inside the directory. This can be confusing when you’re working with wildcards because it’s hard to predict if there are matching subdirectories. To make sure that you’ll get filesystem details on both files and directories, you add the -d option.
As you can see, the first command listed the details of the contents of matching directories, while the second only showed their own details.
Quiz
Let’s do a quick quiz! Take a look at this combination of options. Can you tell how ls is going to behave?
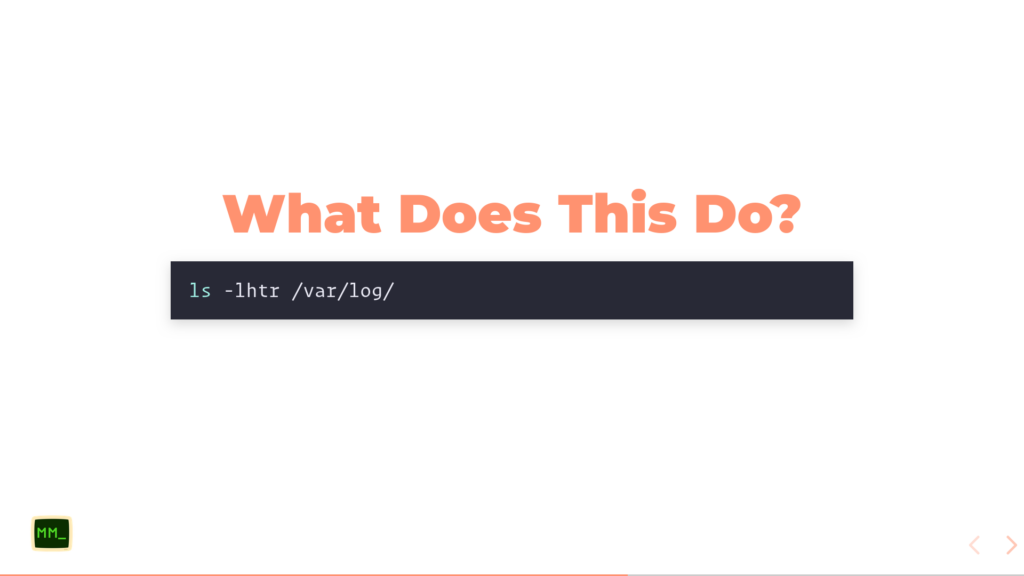
This command will list all the contents of the directory /var/log; you can tell that it’s a directory because the path argument ends with a slash. The listing will be in long format with human-readable file sizes. And since it’s sorted by time in reverse order, the files that were changed most recently will be at the bottom.
Advanced options
There are a number of advanced options that you won’t use as often but are useful to know.
If you want to know the inode related to a file, use the -i option. If you don’t know what an inode is, don’t worry about it. I’ll cover the topic in my Linux courses.
The option -F with a capital F appends indicator symbols after each file name to make discerning its type easier. It adds a slash (/) for directories, an asterisk (*) after each file that is executable, and an at sign (@) after each symbolic link. There are other symbols for lesser-used file types that I’ll omit here.
There is also an option that doesn’t have a single-letter form but is useful nonetheless. If you want to see directories listed separately from regular files, try --group-directories-first.
Aliases
Once you work in a Linux shell more often, you’ll notice quickly that you’re using ls very regularly with certain sets of options. Therefore, it’s useful to define shell aliases for them so you can execute them more easily using a shorthand command.
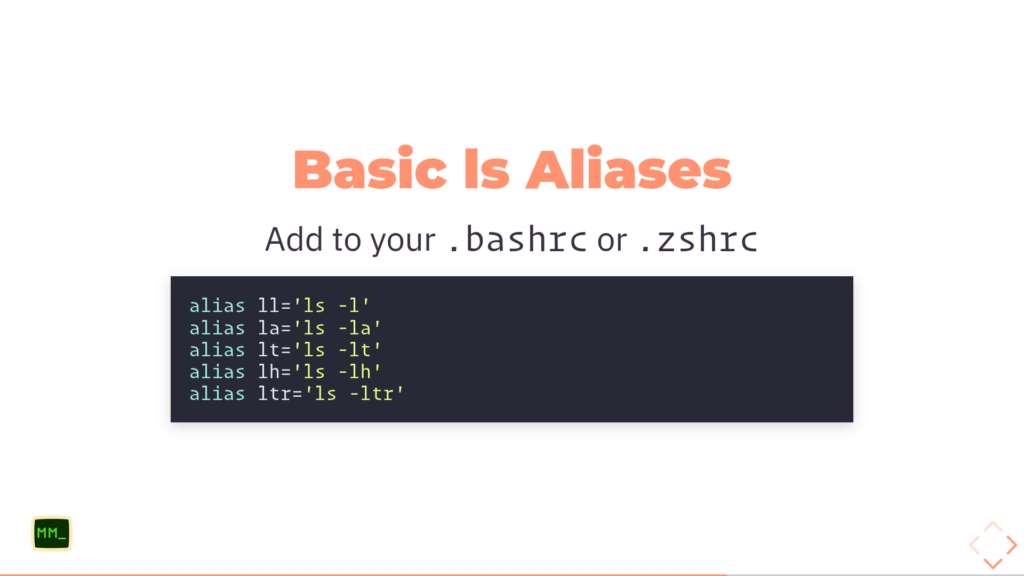
Some of these aliases are so common that they might be already part of the default configuration on your Linux distribution. If not, I recommend you add them, since, for example, typing ltr is much quicker than typing ls -ltr.
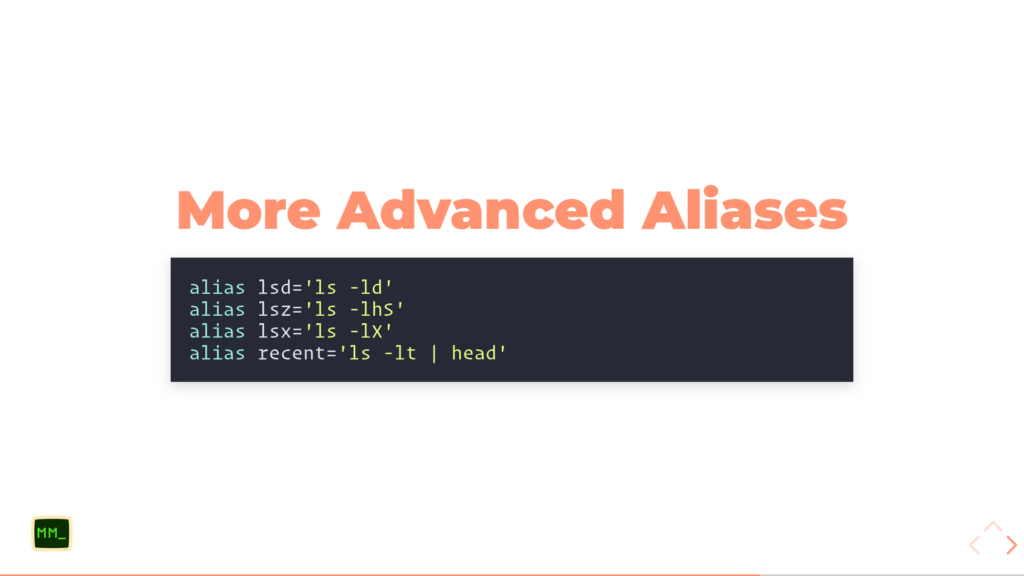
Here are a few more suggestions for useful aliases.
lsd gives you the details of not only files but also directories that you name in the arguments.
The lsz alias is easy to remember; it focuses on file size, after all.
In the lsx alias, you’ll find an option that I haven’t covered up to now. The -X option with a capital X does something very useful: It groups files with the same extension. For example, if you have a directory full of different file formats, lsx will give you a quick overview.
Alternatives
As you can see, ls can do a lot of things. But it’s by far not the only command you can use to explore your storage systems. Let’s look at a few companions, or even replacements!
With tree, you can get a quick overview of the directory hierarchy. In practice, you might start with a quick invocation of tree, and then use ls to zoom in on one or more specific items. Since it’s not installed by default on my machine, I have to install it first.
I guess it’s not hard to guess what the find command does.
And it does it well! Instead of trying to scan the output of ls to find the needle in the haystack of your filesystem, you can tell find exactly what you’re looking for, and it’ll go and search it for you. I’ll cover the find command in its own tutorial.
Finally, there are also modern implementations that cover the functionality of ls and then some. lsd is one of them. Note that this is not the shell alias I mentioned earlier. It’s a command that you have to install yourself.
The same goes for exa, and I’d like to give you a few more details on this useful add-on command.
exa is a modern alternative to ls with enhanced features. It supports all of the common ls options. Additionally, it comes with useful features enabled by default. For example, it can use colours and file type icons to make its output much easier to scan.
Like many modern takes on traditional Unix commands, exa is written in Rust, so you don’t have to worry that its bells and whistles come at the expense of performance.
You can install exa from Github, but by now, it’s found its way into many of the common Linux distributions. On my Debian system, I can simply install it via apt install exa.
By the way, that’s the reason why I’m still covering exa here, although unfortunately, it’s not maintained any more. The community has already filled the gap with a fork named eza with a “zed”, but its installation isn’t quite as straightforward yet.
Let’s look at a few examples of what exa does better than ls.
exa has its own long output format, of course. But it includes additional information that ls doesn’t provide. In this example, it outputs a list of files that has an explanatory header at the top and, in addition to the familiar details, includes each file’s inode number. As DevOps people, you will especially appreciate that it also shows each file’s current Git status.
I mentioned the tree command earlier. exa can replace it, too.
In this example, it traverses the directory hierarchy up to two levels down, and display all its files with their details as a neatly formatted tree.
Conclusion
All right! That’s the ls command. It’s an essential command on every Unix and Linux system. Its options allow you to customize its output. Check out the system manual page for ls to learn more. With shell redirection and pipes, you can process this output further. Check out my Linux courses on how this works exactly.
And with modern re-implementations like eza, you get additional features such as file type icons, tree display and colour shading by file size.
That’s it for this time; I hope that it was useful for you. For more DevOps learning content, check out my website monospacementor.com.
If you’d like to grow your skills quickly with the support of me and other DevOps practitioners, consider becoming a member of The Server Room, my online community. Your membership makes it possible for me to do more teaching in the open source community. For details on all the learning content and community events waiting for you, visit theserverroom.sh.
Our community forum is the ideal place to ask any questions you might have.
Until next time! Take care.